An Introduction to Photographic Filters and Their Application by Christopher John Ball

Tweet
Filters are used within photography to modify the light falling on the subject or passing through the camera lens. Even though we are now in the digital age and see the widespread use of photoshop, filters still have their uses and it doesn't hurt to have an understanding of how they work or can be used.
A filter stops some of the light that passes through them, so the colour or nature of that light changes. For example a Yellow filter allows Red and Green light to pass through but stops a proportion of the Blue light. This allows a photographer, using monochrome film for example, to modify the relative tones in the negative, and therefore the final print, by controlling the proportion of the light coming from the subject, through the lens and onto the film. Whilst they are often used in landscape photography their application in the creation of erotic imagery is often overlooked. Filters can be used to hide skin blemishes, lighten or darken skin tones and much more.
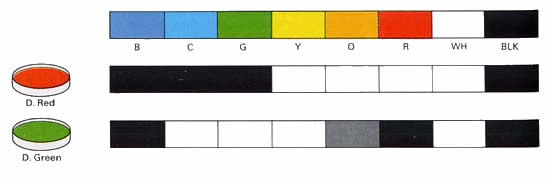
In the above chart Blue, Red and Green are the primary colours of white light. Yellow, magenta and cyan are complementary colours and the most opposite to each primary colour, for the purposes of filtration.
Filters for Black and White.
When used to produce images with monochrome films these filters should really be called contrast filters. If one photographs a landscape with blue sky and white clouds, for example, one may be disappointed with the results. The sky may appear, within the print, to be paler than it seemed to the photographers eye.
This is because most film used today ( panchromatic ) is more sensitive to blue than the human eyes. This has the effect of causing the clouds to barely show up, against the skyline, within the final print.
If one instead photographs the same scene this time using an orange filter, most of the blue is absorbed and therefore this gives the impression, within the resultant print, of making the clouds ' stand out ' against what now appears to be a dark sky. Of course the filter has little, or no, effect if the sky is white with clouds.
Don't forget that other colours, within the scene photographed, will also be effected. Any greenery will will also darken in the example image/filter combination given above. In this case the photographer could use a dark green filter. This would have darkened the sky tones, to some extent, but would have also lightened the greenery as well.
Filters can also be used to make a colour, that would normally merge with another in a monochrome photograph, appear to stand out.Please remember that, as a filter blocks a certain amount, or type, of light transmission to the film, you have to compensate for this.If you are using a single lens reflex camera with a built in light meter you would think that this would be taken care of, and to some extent it is. Though for more accurate compensation you do really have to undertake this manually. The reason for this is that light meters are more sensitive to some parts of the spectrum than others, typically red. Therefore if you are using a reddish filter this could make the meter ' think ' that there is more light than there is and give an inaccurate exposure reading.
All filters, of the type listed below, have a filter factor. This is an amount that the manufacturer recommends you compensate the given exposure. I would recommend that you do this manually. If you are using, for example a red filter, under daylight conditions, the filter factor is x 8. Therefore you will have to change the exposure by x 8. Due to the nature of tungsten light the filter factor is different, in this example it is x 5.
The type of applications that they can be put to, within monochrome photographic image making are shown in the table below.
Darkens blue skies.
Turns red stains white, useful for copy purposes.
Changes green against red into black against white.
Can be used to reveal grain pattern in wood.
Acts in the same manner as a red filter but less extreme. Can be used to tone down blue skies.
Can also be used to compensate for the seeming over sensitivity to blues, deep reds found in pan film types.
Used to darken blue skies.
Turns green stains white, useful in copy purposes.
Changes green against red into white against black
.Can be used to reveal detail in foliage in landscapes.
Lightens blue skies.
Turns red stains black, useful for copy purposes.
Changes blue against deep yellow into white against dark.
The above charts show how filters work in monochrome photography. The first colour chart is photographed through first a deep red filter ( the middle chart ) and then through a deep green filter ( the bottom chart ). The two charts clearly show the ' filtration ' one can expect.
Filters for use within Colour Photography.
The Colour elements of light are measured in degree's Kelvin. This is known as colour temperature. The human eye/brain corrects this colour temperature variance based upon previous experience, for example knowledge that a white sheet of paper is white and not yellow under tungsten light. The brain can rationalise and correct what the camera/film combination cannot. This is because colour film is manufactured to be ' balanced ' to produce images of a correct ' colour temperature ' within certain conditions. Most film is balanced for daylight/flash usage.
These conditions having a colour temperature of 5500 K. If one photographs a scene under tungsten light, having a typical colour temperature of between 3400 and 3200 K, the resultant image will appear to have a yellowish cast to it. This is because tungsten lighting is deficient in the blue end of the spectrum.
Whilst one could, to some extent, correct this during the printing stage it is by no means an ideal way of making colour images and is not a solution for transparency film. The solution is to either use a colour film balanced towards the light source conditions or use a correction filter. Again please remember to compensate your exposure via any given filter factor.
5500 K
( Daylight )
3400 K
( Quartz Tungsten/Halogen )
3200 K
( Tungsten/Photoflood )
Other Filters
Polarising filters :
These grey looking filters can be used in both colour and monochrome photography. Most, though not all, filters of this type are circular and consist of two rotating filters. Rotating a polarising filter produces two effects. The first is to reduce any reflections on glass or water, but not chrome. This effect is enhanced when the subject is photographed from an angle. The benefits of this are obvious. The second effect is to ' improve ' colour saturation. This gives the effect of darkening or intensifying blue skies for example.
Neutral Density Filters :
These are grey, colourless filters that affect all wavelengths equally and hence cut out image light by a set amount. These filters come in 3 or more densities equating to whole stops. These are used to cut out light so as to use slower shutter speeds or narrower depth of field, for creative purposes, where this could not be done, conventionally, due to intense light conditions or fast/sensitive film.
Ultra Violet :
These filters, as the name suggests, absorb Ultra Violet light. The filters look transparent. Without there use haze can be exaggerated or blue, in colour film images, is also exaggerated. If you are using any other warm filter you do not need to use a UV filter as the warm filter will also filter out this UV light.
Effects Filters :
Filters such as diffusion/soft focus, multi-image and starburst, for example are not really filters in the strictest sense. Some, with the possible exception of a soft filter, are of questionable benefit photographically.
July 2024 Several books, featuring Christopher John Ball's photographs, are now available through Amazon or click on an image below to purchase via secure payments on lulu.com
Tweet